DIY Scrap Mechanic Costume + Hammer Tutorial
After sharing our annual pumpkin patch visit and our coordinating pumpkin patch outfits, we are officially moving from fall fun into Halloween mode!
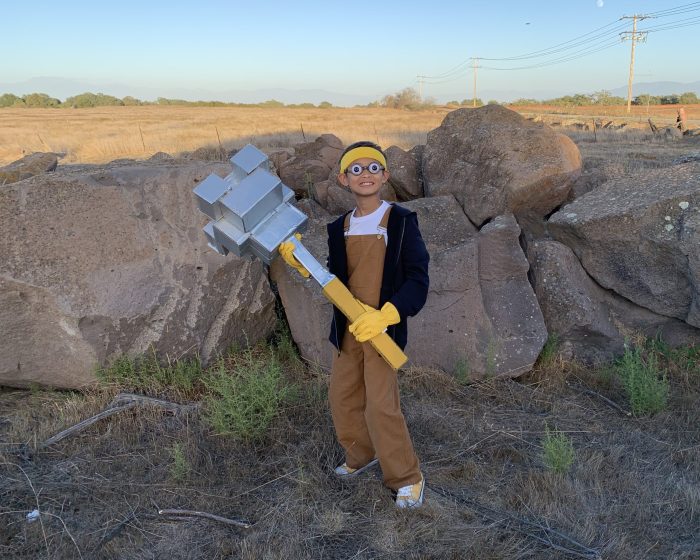
Last year, our Halloween costumes were inspired by one of my son’s favorite games, Scrap Mechanic. When he decided he wanted to dress up as the mechanic, we knew we could recreate the look pretty easily with a few pieces we purchased. But there was one part of the costume we knew we couldn’t simply buy – the hammer.
The mechanic’s signature hammer is such an important part of the Scrap Mechanic look, so we decided to make our own. And as it turns out, creating a DIY Scrap Mechanic hammer out of cardboard was not only easier than I expected, but it was also one of the most fun parts of putting his costume together. It ended up being the perfect finishing touch—and honestly, the piece that really brought the entire costume to life.
So, let’s dive in!
Materials
You only need a few basic supplies to make this cardboard hammer:
Cardboard boxes
Tape
Scissors*
Hot glue
Paint brush
Silver and yellow paint
*You could also use a utility knife or box cutter to make some of the larger cuts, but I used scissors for this project.
How to Make a Scrap Mechanic Hammer
Step 1: Make the Hammer Pieces
To start, I broke the hammer down into individual cardboard pieces.
Since the Scrap Mechanic hammer has a very blocky shape, it was actually pretty straightforward to recreate with cardboard. I built each section by cutting two matching pieces for the front and back, then adding four longer pieces along the sides to connect them and create the 3D shape. That said, I didn’t use any exact measurements for the pieces. Instead, I simply eyeballed the proportions as I went, making sure the finished hammer would be the right size for my son and wouldn’t be too big or too small.
For the hammer head, I made one large center block, four medium-sized pieces to build out the sides, and four smaller square pieces for the details on top.
Then, I made the handle using the same basic method. I cut pieces for the front and back and connected them along the sides. I used one longer piece and one shorter piece, with the shorter piece connecting to the end of the longer one to recreate the stepped shape of the original hammer.
With all of the cardboard pieces cut, I was ready to start putting everything together.

Step 2: Assemble the Hammer
To assemble the pieces, I used a hot glue gun, adding masking tape in a few spots to help hold different parts of the structure securely in place. And, because the hammer is made up of several individual pieces, I found it helpful to work one section at a time, making sure each piece was securely attached before moving on to the next.


Step 3: Paint the Hammer
After the hammer was fully assembled, it was time for some color!
I painted the hammer head silver and the handle yellow, using about two coats of each for good coverage. The paint really made a difference. It was amazing how much the cardboard transformed with a couple coats of paint!

Step 4: Put Together the Mechanic Costume
With the hammer finished, all that was left was to put the rest of the mechanic costume together.
I purchased the clothing and accessories we needed to recreate the mechanic’s look from Amazon, including the overalls, shoes, gloves, and sweatband, which made assembling the costume pretty simple.
And just like that, we brought the mechanic to life!


I have to say, I was really happy with how the hammer turned out. What started as a few pieces of cardboard ended up being the part of the costume that made the biggest impact. And the best part? It was a pretty simple DIY project that didn’t require any complicated materials or special crafting skills. If you’re planning a Scrap Mechanic costume and need the signature hammer to complete the look, this cardboard version is definitely worth trying.
But this was only half of our Halloween costume story!
Since this was a mommy-and-me costume, I’ll be sharing my costume—and how our two looks came together—in Part Two. #staytuned

Leave A Comment